Field Purchasing of Specified Products
Words: Steven FechinoWords: Steven Fechino, Engineering and Construction Manager at Mortar Net Solutions
Photos: PROSOCO, Mortar Net Solutions, Spec Mix, Masonry Magazine
 Purchasing the materials for a project is not intended to be complicated, but with all of the products to choose from, it can become a bit of an education many superintendents do not think they have time. Specifications and submittals should answer many of the questions, but once in a while the mason can feel like he is guessing. One thing about the products we use is that they have improved in their chemistry and performance over the past few years. This requires masons to adapt to the changes, and manufacturers to offer guidance and instruction when the purchasing phase begins.
Recently, I attended a demonstration of a product system I found impressive. It was the R-Guard Cat 5 system manufactured by PROSOCO. I have been a customer of PROSOCO’s for many years and had purchased hundreds of gallons of their products. The Cat 5 system (including FastFlash, Joint & Seam Filler and Cat 5 silyl-terminated polymers) initially seemed fool-proof. However, as I learned more about it, I realized that if I had to purchase it tomorrow I might have questions on figuring quantities of FastFlash and the coverage rates of the air and water barrier. Considering the project from the superintendent’s point of view, I realized that many of the questions I had could easily be answered looking at my take-off sheet. For instance, the Cat 5 material required was simply the square footage of my veneer. I could easily keep the wall opening quantities in my overall number (assuming I did not have extreme openings) and this would figure my wall opening perimeters (transitions) and my waste all in one step. The technical data sheets found on the PROSOCO website show that the coverage rate for sheathing is approximate, anywhere from 50 to 100 square foot per gallon. Therefore, I used a coverage rate of 75 square foot per gallon to base purchasing on. The transitions where I would install the FastFlash can easily be figured if you use the standard stud at 5 ½ inches (including sheathing) in depth. That will yield approximately 16 linear foot of opening per sausage tube. When sealing the sheathing joints with the FastFlash, you can figure 25 linear foot of board stock joint per sausage tube, and you will complete your Purchase order.
 Wall material = Square foot of wall / 75 square foot per gallon (sheathing) = number of gallons
FastFlash for transitions = Linear foot of window and door perimeter / 16 lf per sausage tube = number of tubes
FastFlash for sheathing board joints = LF of joints / 25 lf per sausage tube = number of tubes
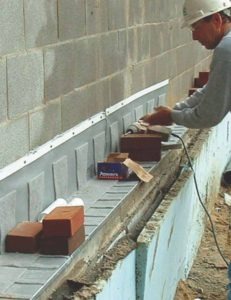
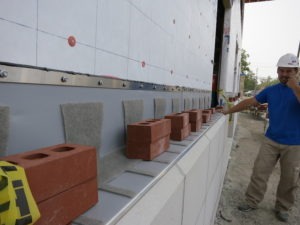
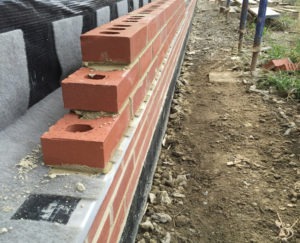
Flashings are another product that has become systemized over the past few years. I once worked for a mason who estimated the flashing as 3 times his building perimeter. He was never accurate, but he always had a quick number. Today flashings can be purchased as a complete set of miscellaneous parts that need to be assembled or you can purchase it pre-made or unitized directly out of the box. Mortar Net Solutions is offering pre-assembled TotalFlash which incorporates the piece-to-piece laps, membrane, drip edge, termination bar, weep tabs, anchoring screws and drainage mat all in a single piece that installs directly in place on the wall. This system eliminates time and frustration when figuring the individual products. For instance, do roll lengths of membrane come in 50 or 75 linear foot rolls and can you buy single rolls? The term bar and drip edge, they come in 10 foot pieces, so you will have scrap at every window. The drainage mat and weeps tabs are all included, no separate figuring. So, how do you figure what you need? Assuming the building is a two-story brick veneer, the masonry openings are all 8 feet wide and the building is rectangular. There are 6 standard doors. As the superintendent, the information you need can be found on the plan and the window and door schedule.
 First: Compute the number of flashings that surround the building. It should be one, located at the base.
Second: Compute the door opening quantities and widths from the window and door schedule. Add one foot to each opening for bearing and tally up the number of doors, which will be six. With each door you will have four end dams, two at the top and two at the base flashing.
Third: Looking at the window and door schedule, add one foot for bearing to the windows and count how many are on the entire façade. There will be two end dams per window.
Fourth: The sealant you use will need to be chosen for the membrane that you select, but with all of the polymer-based flashings used today, I recommend using one of our sealants that are matched for compatibility and performance for all of your flashing seams. Figuring the proper is very easy. For every linear foot of flashing you will have two feet of butyl. When computing, your laps take the linear foot of flashing and divide by 5. This will give you the number of pieces of TotalFlash that you will have, with each lap will use 3 linear foot of butyl.
Fifth: Butyl sealant comes in 10.3 ounce tubes and when you cut the tip of the tube at a little more than ¼ inch you will get 18 linear feet per tube. If you choose to cut a wider bead you will shoot less per tube. Figuring the end dams and corners you can figure about 15 end dams per tube and 4 corners per tube based on 18 linear foot per tube, all the butyl quantities are approximate, but you should be close.
 Base Flashing: Linear foot of perimeter of building - door openings = Linear feet of Base flashing
Door Head Flashing: door opening width (plus one foot per opening) X number of door openings = linear feet of door head flashing
Window Head Flashing: window opening widths (plus one foot per opening) X number of windows = linear feet of window head flashing
End dams: quantity of windows X 2 + quantity of doors X 4
Corner pieces: number of inside corners + outside corners added together, drip edge corners for outside corners
Sealant approximate amount: 1 lf/end dam, 3 LF/corner, 2 lf per lf of base + head flashing, 3 lf per lap at 5 ft on centerThe consideration of silo mortar is a big step for contractors as they grow larger and the masonry work of each project increases more and more. The silo consists of a waterproof storage tank that holds materials above the mechanical mixer, with the lime, sand and cement consistently mixed to proper proportions in a dry state. The mechanical mixer operation is performed by simply adding a specific amount of water to the tub of the mixer prior to opening an overhead chute that will dispense as much material as you will need for the particular batch directly into the tub of the mixer. The mixing operation is very simple because the ingredients of the mortar are all delivered to the mixer using gravity with the proper color and strength every time. The mud man can perform this operation faster than if his mixing operation consisted of the sand pile and bag.
He would begin by adding water to the tub, 8 shovels of sand, splitting a bag of mud open on the grate, checking the water amount, adding 8 more shovels of sand, checking the water amount one more time, and picking up the trash. If the mixer is a larger machine that can handle multiple bags at the same time, then the process would be repeated for every batch. Since the sand can be wetter on the bottom of the pile than at the top, when you do the sand pile and bag method, the mud man must monitor the amount of water that is added very closely because it will differ between batches, especially if you are using colored mortar. The silo method will deliver sand that is consistent and dry, allowing the same amount of water to be added to each mix and providing consistent color and workability.
The silo has other advantages that the pile and bag method of mixing does not. It can be moved almost effortlessly to different locations on a jobsite that can, in some cases, increase masonry efficiency, reduce handling time of mortar materials and reduce the operator’s time required to handle the stocking operation because it allows the project to become condensed.
The move from sand pile and bag method to silo will require a forklift, the silos cannot be charged (process of filling the silo with bulk bag mix) without one.
Silo: Provided to contractor when purchasing bulk materials
Type N and S mix: Material coverage varies depending on the individual mason’s techniques and material being laid. Discuss with local representative for estimates.
Forklift: Provided to project or for use by Masonry contractor
Adhered Masonry Veneers have become popular over the past 15 years with a market that continues to grow at historically fast rates. With many mergers, partnerships and new product developments, the process of estimating and installing the work associated with adhered masonry veneers has had a few minor changes during the past few years.
 The adhered masonry veneers, which are often times referred to as “lick and stick” or just “thin veneers”, cover several products including natural thin stone veneers, manmade precast stone, full bodied thin veneers and thin brick veneers. The estimating of materials for this type of work begins with the square footage that you intend to cover. Assuming a wall that is 25 feet long by 8 feet tall with one corner that has an additional leg of 5 feet. The first consideration is in the material that you want to install. Coverage rates will vary from one material to the next and also depend on if you plan to add a grouted joint or install dry stack. Corners are usually premade and are sold by the linear foot of corner (I recommend that the square foot of corner material be used in the waste calculation for simplification). Here is an example:
Area of veneer: 30 linear feet wide x 8 linear feet tall = 240 square feet
Linear foot of corner: 8 linear feet (or, if more than one corner, just add the linear feet of corners measured vertically)
Grouted joints: Mortar quantity will vary between different materials. Your distributor should be able to assist you in figuring amounts. When in doubt, assume 100-150 square foot per bag of mortar and shoveled sand.
Wire Lath: Sheets come in 27 inches x 97 inches pieces with proper lapping of material you can assume about 17.25 square foot per piece. 240 square foot / 17.25 square foot per piece = approximately 14 pieces
Alternate:
Combination Wire Lath with Grade D backing or Drainage Mesh: Drainage mats located between the Weather resistant barrier and the metal lath have been proven by building scientists to improve the performance of all adhered thin veneers. The drainage plane allows for increase drying of the scratch coat because the moisture that passes through the scratch coat can drain unobstructed to the weep screed (same basic principal as a cavity wall) through the drainage mesh and also allow for air to move behind the veneer to increase drying times. The use of a drainage plane also will reduce the requirement for two layers of weather resistant barriers saving the adhered masonry veneer installer one step in installation process. LathNet which is manufactured by Mortar Net Solutions has an-in-one product that combines a drainage plane and wire mesh required for the project. Sheets come in 27 inches x 97 inches pieces with proper lapping of material you can assume about 17.25 square foot per piece, same as above. This will also estimate the second required layer of Weather Resistant Barrier (WRB). 240 square foot / 17.25 square foot per piece = approximately 14 pieces
 Weather resistant barrier: The Weather Resistant Barrier is usually run straight through the wall openings. Use the square foot of wall for this area calculation.
Scratch Coat Mortar: Using the bag of mortar and shoveled sand products, you can figure a range of 35 to 60 square foot per bag. 240 square foot / (say an average of 48 square foot per bag) = 5 bags of mortar
Top Coat or Setting Bed Mortar: Using the bag of mortar and shoveled sand products, you can figure a range of 75 to 95 square foot per bag. 240 square foot /(average 85 square foot per bag) = approximately 3 bags of mortar
Material Waste: This is a personal calculation based on each company’s performance. This is a number based on estimator’s personal preference.
Area of veneer: Linear feet wide x linear feet tall = square feet
Linear foot of corner: Linear feet of corners measured vertically = linear foot of corners
Grouted joints: Mortar quantity will vary between different materials
Wire Lath: Wall area in square feet / 17.25 square foot per piece = number of pieces
Alternate:
 Combination Wire Lath with Grade D backing or Drainage Mesh: Wall area in square feet / 17.25 square foot per piece = number of pieces, this also provides you with the material required for the second sheet of WRB.
Weather resistant barrier: Area of complete wall in square feet.
Scratch Coat Mortar: Using a range of 35 to 60 square foot per bag. Wall area square foot / square foot per bag = bags of Mortar
Top Coat or Setting Bed Mortar: Using a range of 75 to 95 square foot per bag. Wall area square foot / square foot per bag = bags of mortar
Material Waste: This is a number based on estimator’s personal preference.